Elevate Autotask Tickets With IT Glue Checklists
IT professionals are often overwhelmed with repetitive, mundane tickets. These repeat tickets not only consume valuable time but also lead to the unnecessary escalation of issues that could be resolved at the Level 1 support tier. This problem can be significantly mitigated by providing proper documentation and guidance to Level 1 technicians.
Introducing checklists into Autotask tickets aims to solve this issue by offering step-by-step instructions right at the technicians’ fingertips. In this blog, we’ll dive into how to implement checklists into Autotask tickets to improve ticket resolution times and create a more seamless IT environment.
Step 1: Identify common, repeatable tickets
To start with, it’s essential to identify the common, repeatable tickets that are a time drain on your business. Autotask dashboards and reporting tools are invaluable for this task. By analyzing the most frequent ticket types, you can pinpoint where your efforts will have the most significant impact. Focus on the tickets that consume the most time and occur most frequently.
Step 2: Building the checklist
Once you’ve identified the troublesome ticket types, it’s time to build your checklist. Consult with your senior technicians to understand how they would solve these problems accurately every time. Research best practices from industry peers or online documentation. The goal is to break down the resolution process into bite-sized, manageable steps that a Level 1 technician can follow without confusion.
Step 3: Build the supporting documentation
Some steps in your checklist may require additional information that would be best documented in a standard operating procedure (SOP) rather than as a simple task name. If you don’t have a structured documentation repository, IT Glue offers a robust solution to get started. Ensure that all supporting documentation is clear, concise and easily accessible.
Step 4: Program the checklist
Programming your checklist ensures that technicians have the tools they need to solve tickets quickly. You may build out checklists in either Autotask or IT Glue (if you are using the Autotask/IT Glue integration). Below, we’ll go over both methods of building checklists. Use the platform you are most comfortable with to create detailed, reusable checklists.
Option 1: Autotask Checklist Library
If you’re using Autotask, you can add a checklist library object. This feature allows you to create and store checklists that can be easily referenced and used in tickets.
For detailed instructions on adding checklists within Autotask, refer to the section titled “Add or edit a library checklist” in the Autotask Checklist Library documentation here.
Pro tip: Automate the addition of Checklists to Autotask tickets
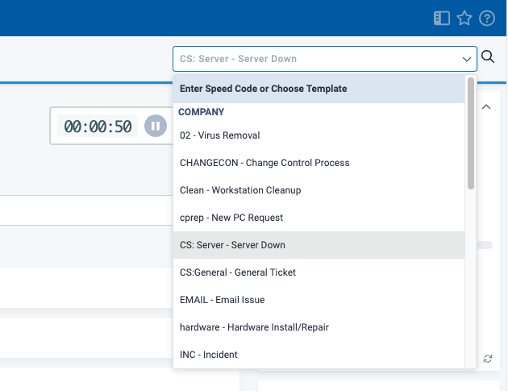
One of the most powerful features of Autotask is its automation capabilities. You can easily add checklists to tickets using Form Templates and Speed Codes. Form Templates make it easy to update multiple fields and add checklists to a ticket with a short, easy-to-remember speed code.

You can also configure Autotask Workflow Rules to automatically add the appropriate checklist to a ticket based on specific criteria, or have a checklist added by default as part of the Ticket Category. This ensures that technicians have the necessary guidance from the moment they open a ticket.
Option 2: IT Glue Checklist Templates
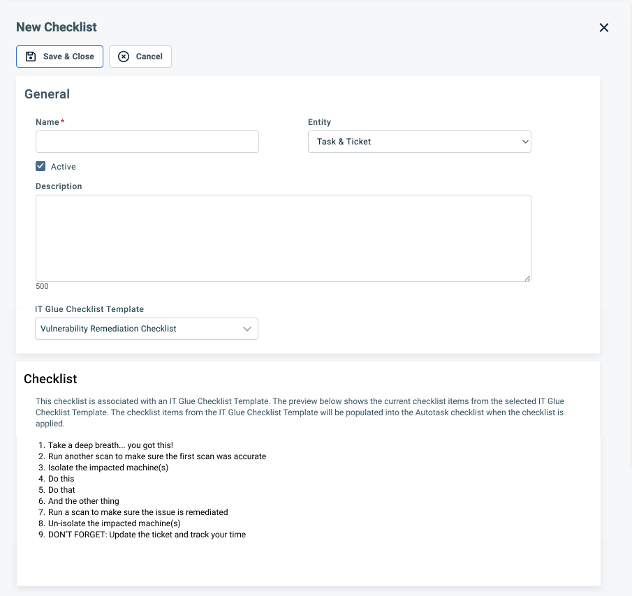
If your organization has the IT Glue integration enabled, you can associate the new checklist with an existing IT Glue Checklist Template.
To do this, simply navigate to the ticket where you wish to add a checklist and click on “Add from IT Glue.” This action allows you to select from your existing IT Glue Checklist templates and apply them to the ticket, ensuring that every task is accounted for and executed according to your established protocols. Please note that you cannot manually create additional checklist items if you associate an IT Glue checklist template.

Pro tip: Link IT Glue Checklist Templates to Autotask Checklist Library
If you frequently build checklist templates in IT Glue and have the IT Glue integration enabled within Autotask, linking IT Glue checklist templates to the Autotask checklist library ensures that the most current version of the checklist is always available and in use. Whenever a checklist is added to a ticket, the latest definition is pulled from IT Glue in real-time. This integration simplifies the process of making incremental updates to your checklists directly in IT Glue, ensuring that your technicians always have the most up-to-date information.

Conclusion
Implementing IT Glue Checklists in Autotask tickets can revolutionize how your IT team handles repetitive issues. By providing clear, step-by-step instructions, you empower Level 1 technicians to resolve more tickets independently, reducing the burden on higher-level support staff. This integration not only improves efficiency but also enhances the overall quality of service provided to your clients. Start today by identifying your most frequent tickets, building comprehensive checklists and leveraging the powerful integration between Autotask and IT Glue to streamline your support processes.


